[Top] [Prev] [Next] [Bottom]
This chapter uses an example to demonstrate how to configure the PortMaster to connect from networked hosts to shared devices attached to the PortMaster. This type of connection provides user access to modems, printers, and other RS-232 devices.
The following topics are described:
Use one of the following methods for providing access to shared devices on the PortMaster:
-
You use a UNIX host that supports the PortMaster in.pmd daemon. With this
daemon, you can configure ports as host devices and access them as pseudo-tty
terminals from the host using the tip command, UUCP, and other applications.
-
You configure the ports as network devices and access them via Telnet, rlogin, or a
clear channel TCP connection (netdata).
One function of a communications server is to provide network users with access to shared devices such as printers and modems. This access can be provided if the port connected to the printer or modem is configured as a host device port. This configuration is also useful for tip and UUCP services.
Once a port is defined as a host device, you configure it with the PortMaster device service, and select a pseudo-tty terminal. The host device port can now be accessed if you establish a pseudo-tty connection to the port from a UNIX host with the PortMaster daemon software installed. In this case, the port operates as a host-controlled device.
Figure 18-1 shows a diagram of the host device configuration using the PortMaster device service and a pseudo-tty connection.
Host Device Configuration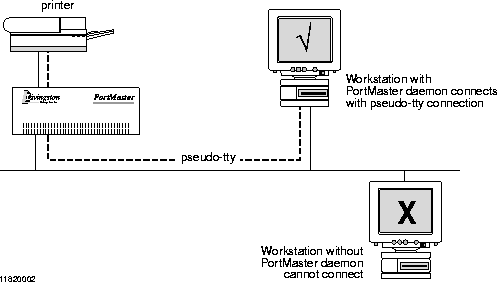
In this configuration, a workstation with in.pmd installed can access a printer attached to a PortMaster port, even if the printer is on the other side of the country.
This configuration sets the port for host device access, but uses the rlogin, Telnet, or netdata device service to access the attached device. In this configuration, the host device name is set as /dev/network. This configuration is used in cases where users want to use Telnet or rlogin to log in to the shared device from multiple hosts or from a host that does not support in.pmd.
Figure 18-2 shows an example of the network device configuration.
The network user configuration is most commonly used to provide a Telnet session with the device attached to a specified PortMaster port. The example in this chapter sets ports for network access so the administrator can telnet to each modem connected to a PortMaster port for configuration purposes. In this application, each port is identified by a unique port number assigned during the configuration process. You can also configure a pool of ports at a single TCP port number.
The netdata (TCP clear channel) device service is most often used when you want to have a custom application open a TCP connection to an RS-232 device, or to connect two serial devices across a network.
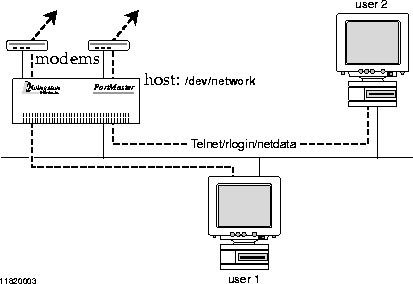 Network Device Configuration
The example described in this chapter allows a user to dial in to port S2 on the PortMaster, log in to a workstation, and access a serial printer attached to port S9 as /dev/ttyre, using the PortMaster device service. The workstation user can also access port S2 as /dev/ttyrf when it is not being used for login service.
The modem attached to port S2 is connected with a straight-through cable and uses hardware flow control and carrier detect. The DTE rate between the modem and the PortMaster is locked.
To use the PortMaster login or device service, the workstation user must install the PortMaster daemon in.pmd in the /usr/etc directory. She must also modify the /etc/services and /etc/inetd.conf files to tell the workstation where to find in.pmd. She must also add /dev/ttyrf to the /etc/remote file and /dev/ttyre to the /etc/printcap file.
To install your PortMaster, follow the instructions in your hardware installation guide. If you need additional help, refer to the troubleshooting chapter of the installation guide. The example in this chapter shows variables in italics. Change these values to reflect your network.
Once you have assigned an IP address to the PortMaster, continue with the following steps:
-
Attach the modem to port S2 with a straight-through cable.
-
Attach the printer to port S9 with a null modem cable if the printer is a DTE device.
Pinouts for both cables are given in your hardware installation guide.
-
Configure global settings (page 18-4).
-
Configure Ethernet port settings (page 18-5).
-
Configure two-way serial port (S2) settings (page 18-6).
-
Configure serial printer port (S9) settings (page 18-7).
-
Configure parallel port (P0) settings (page 18-8).
-
If necessary, configure network devices for Telnet access (page 18-8).
Configure the global settings to the values shown in Table 18-1
.
You can also set the host for ports S2 and S9 to 192.168.200.2 if you plan to use the other ports for some other host. Once you have configured global settings as shown in Table 18-1, save the configuration using the following command:
You must configure settings for your Ethernet interface, dial-in-and-out (two-way) port, and printer port. You can connect the printer to either a serial port or a parallel port.
Configure the Ethernet interface to the values shown in Table 18-2.
Once you have configured the Ethernet interface as shown in Table 18-2, save the configuration using the following command:
For more information on Ethernet settings, refer to Chapter 4, "Configuring the Ethernet Interface."
In the example, the workstation user wants to dial in to port S2 sometimes and use the tip command dial out through the modem connected to port S2 at other times. Configure the S2 port with the values shown in Table 18-3.
Leave all other settings at their default values. Once you have configured port S2 as shown in Table 18-3, reset the port and save the configuration using the following commands:
For more information about serial asynchronous ports, refer to Chapter 5, "Configuring an Asynchronous Port."
In the example, a serial printer is connected to port S9. Configure the S9 port with the values shown in Table 18-4. If the printer is a DTE, use a null modem cable to connect to the port.
Leave all other settings at their default values. Once you have configured port S9 as shown in Table 18-4, reset the port and save the configuration using the following commands:
The workstation printer subsystem should now be able to send printer jobs to /dev/ttyre and reach the printer.
You can also configure the parallel port P0 to access a printer. To configure the P0 port for a printer, use the values shown in Table 18-5.
Leave all other settings at their default values. Once you have configured port P0 as shown in Table 18-5, reset the port and save the configuration using the following commands:
To access modems or other devices attached to PortMaster ports via Telnet, use the general configuration given earlier in this chapter but use the settings shown in Table 18-6.
This example is for port S1.
After resetting port S1, you can access it using Telnet from your host, by typing the following commands:
The value pm1 is the hostname of the PortMaster you are accessing, and 6001 is the TCP port set for the port you are accessing. You can also set several ports to the same TCP port to create a pool of ports available for Telnet access.
Note ¯  If you are using this configuration to configure your modems, refer first to Chapter 10, "Using Modems."
[Top] [Prev] [Next] [Bottom]
spider@livingston.com
Copyright © 1998, Livingston Enterprises, Inc. All rights
reserved.