[Top] [Prev] [Next] [Bottom]
This chapter uses an example to demonstrate how to configure the PortMaster to connect to a synchronous leased line at speeds up to T1 (1.544Mbps) or E1 (2.048Mbps). This chapter also describes how to configure a dial backup connection for your synchronous line. The example described in this chapter connects a PortMaster router located in one office with a PortMaster router located in another office using a dedicated leased line.
The following topics are described:
Leased line connections use leased or dedicated lines to establish a permanent connection between two routers. Once the connection is established, it remains available on a continuous basis whether there is network traffic between the two locations or not. Leased line connections require a digital service unit/channel service unit (DSU/CSU) connected between the router and the dedicated line. The DSU/CSU takes digital data in the format used by the router and translates it into the digital format used by the leased line. Leased line connections also require a carrier that provides an external clock signal.
PortMaster routers support leased line connections using synchronous ports and the PPP protocol. In this configuration, one PortMaster is usually connected to another PortMaster or other router over a leased line where each router uses its own Ethernet address for the serial link-known as IP unnumbered-and the address of the other end is discovered dynamically. In this way, a dedicated high-speed connection is established between two routers located at separate sites. Figure 19-1 shows an example of the leased line connection.
Leased Line Configuration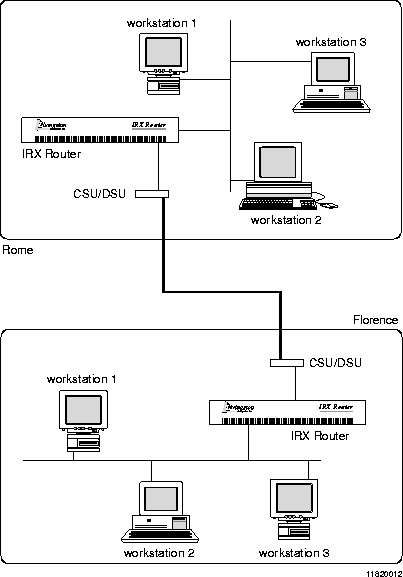
If you are connecting two networks together for the first time, you should make sure first that the two networks are not overlapping subnets. For more information on network numbers and subnetting, see Appendix A, "Networking Concepts."
In the leased line configuration described in this chapter, the Ethernet address of the PortMaster routers is used as the address for the serial link in a point-to-point unnumbered serial connection. Because the PortMaster relies on an external clock signal, you do not need to set the speed on the synchronous port. The port speed is whatever the carrier sends. If you choose to set a speed, it is used for documentation purposes only. The speed you set is ignored by the PortMaster.
PortMaster synchronous ports support leased line connections from 9600bps to T1 (1.544Mbps) or E1 (2.048Mbps) speeds. Synchronous ports used for leased line connections are configured for PPP operation and can have input and output filters for network security.
Note ¯  The PortMaster also supports numbered IP interfaces on leased lines, but Lucent Remote Access does not recommended this method because it wastes IP address space.
This example connects a PortMaster Office Router in Rome with a PortMaster Office Router in Florence using a leased line connection.
To install your PortMaster, follow the instructions in your hardware installation guide. If you need additional help, refer to the troubleshooting chapter of your installation guide. The example in this chapter shows variables in italics. Change these values to reflect your network.
Once you have assigned an IP address to the PortMaster, continue with the following steps:
-
Configure the following settings for the PortMaster in Rome:
a. Global settings (page 19-4)
b. Ethernet interface settings (page 19-4)
c. Synchronous WAN port settings (page 19-5)
-
Configure the following settings for the PortMaster in Florence:
a. Global settings (page 19-6)
b. Ethernet interface settings (page 19-7)
c. Synchronous WAN port settings (page 19-7)
-
Troubleshoot the configuration, if necessary (page 19-8).
Configure the settings for the PortMaster Office Router in Rome with the values in the following sections.
Configure the global settings to the values shown in Table 19-1.
Once you have configured the global settings shown in Table 19-1, save the configuration by using the following command:
For more information about global settings, refer to Chapter 3, "Configuring Global Settings."
Configure the Ethernet interface on the PortMaster Office Router in Rome to the values shown in Table 19-2.
Once you have configured the Ethernet interface as shown in Table 21-2, save the configuration using the following command:
For more information on Ethernet settings, refer to Chapter 4, "Configuring the Ethernet Interface."
Configure the synchronous WAN port on the PortMaster Office Router in Rome with the values shown in Table 19-3. Port S1 is used in this example. The IP address for the port is left unconfigured, accepting the default IP address value of 0.0.0.0.
If you are not sure of the IP address on the other end of the connection, you can set the IP destination to 255.255.255.255 and the PortMaster will attempt to learn the address.
Leave all other settings at their default values. Once you have configured the port S1 as shown in Table 19-3, reset the port and save the configuration using the following commands:
For more information about synchronous ports, refer to Chapter 6, "Configuring a Synchronous WAN Port."
Configure the settings for the PortMaster Office Router in Florence with the values in the following sections.
Configure the global settings to the values shown in Table 19-4.
Once you have configured the global settings shown in Table 19-4, save the configuration by using the following command:
For more information about global settings, refer to Chapter 3, "Configuring Global Settings."
Configure the Ethernet settings to the values shown in Table 19-5.
Once you have configured the Ethernet interface as shown in Table 19-5, save the configuration using the following command:
For more information on Ethernet settings, refer to Chapter 4, "Configuring the Ethernet Interface."
Configure the synchronous WAN port with the values shown in Table 19-6. The IP address for the port is left unconfigured, accepting the default IP address value of 0.0.0.0.
If you are not sure of the IP address on the other end of the connection, you can set the IP destination to 255.255.255.255 and the PortMaster will attempt to learn the address.
Leave all other settings at their default values. Once you have configured the port S1 as shown in Table 19-6, reset it and save the configuration using the following commands:
For more information about synchronous ports, refer to Chapter 6, "Configuring a Synchronous WAN Port."
If you are having problems, use the information in this section to debug your configuration.
If you are having trouble with a leased line connection, verify the following:
-
For information about the interpreting the results of the debug command, refer to
"Debugging and Interpreting PPP Negotiation" on page 20-9. Once you have
verified that the PPP negotiation is correct, use the following commands to turn off
the debug utility:
-
Then set the CSU/DSU for local loopback. You should see the following message:
-
For more information about the interpreting the results of the debug command,
refer to "Debugging and Interpreting PPP Negotiation" on page 20-9.
[Top] [Prev] [Next] [Bottom]
spider@livingston.com
Copyright © 1998, Livingston Enterprises, Inc. All rights
reserved.