[Top] [Prev] [Next] [Bottom]
This chapter uses an example to demonstrate how to configure the PortMaster to establish a continuous connection to an Internet service provider (ISP), shown in Figure 16-1. This connection creates a gateway from your office to the Internet using a dial-out connection through one of the serial ports on your PortMaster. Internet connections can also be set for on-demand operation.
The following topics are discussed:
Continuous Internet Connection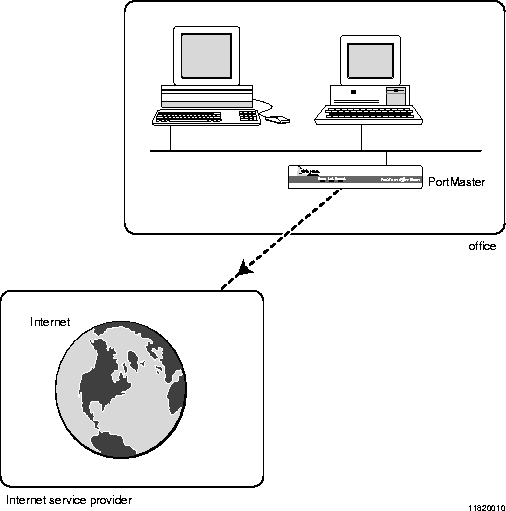
You can configure two types of continuous connections:
-
A continuous dial-up connection starts as soon as the PortMaster boots and is
redialed whenever the telephone connection is dropped. If you use a continuous
dial-out link from the S1 serial port, one location table entry is needed for the ISP.
-
The network hardwired configuration is typically used if you are using a leased
analog or digital line or an asynchronous-to-synchronous converter. If you use a
network hardwired port, no entries are needed in the location table.
This example provides configuration information for both types of continuous connections.
For this example, IPX packets are not transmitted to or from the ISP.
You can also connect to an ISP with a dial-on-demand configuration, as described in Chapter 15, "Using Office-to-Office Connections." However, dial-on-demand ISP connections do not allow Internet users access to your site when the dial-up connection is not established.
The example described in this chapter connects a PortMaster router located in an office (office1) with an ISP (isp1) using Frame Relay on a synchronous interface.
To install your PortMaster, follow the instructions in your hardware installation guide. If you need additional help, refer to the troubleshooting chapter of the installation guide. The example in this chapter shows variables in italics. Change these values to reflect your network.
Once you have assigned an IP address to the PortMaster, continue with the following steps:
-
Configure the following settings for the PortMaster in Office 1:
a. Global settings (page 16-4)
b. Ethernet interface settings (page 16-5)
c. Serial port settings (page 16-5 or page 16-6)
d. Dial-out location (page 16-7)
-
Test the configuration (page 16-8 or page 16-10).
-
Set network filtering (page 16-10).
Alternatively, you can configure a PortMaster with an ISDN port for an Internet connection. See "Using ISDN for Internet Connections" on page 16-12.
Configure the global settings to the values shown in Table 16-1.
For more information about global settings, see Chapter 3, "Configuring Global Settings."
After configuring the global settings, save the configuration using the following command:
You must configure settings for your Ethernet port and settings for either a dial-out or hardwired connection on your asynchronous port.
Set the Ethernet parameters to the values shown in Table 16-2.
After configuring the Ethernet interface, reset it and save the configuration using the following commands:
For more information on Ethernet interface parameters, refer to Chapter 4, "Configuring the Ethernet Interface."
For continuous dial-out on a serial port, configure the port with the values shown in Table 16-3.
Leave all other settings at their default values. After configuring the serial port, reset the port and save the configuration using the following commands:
For more information about asynchronous ports and configuring modems, refer to Chapter 5, "Configuring an Asynchronous Port."
To establish a hardwired connection on a serial port, configure the port with the values shown in Table 16-4.
Leave all other settings at their default values. After configuring the serial port, reset the port and save the configuration using the following commands:
For more information about asynchronous ports, refer to Chapter 5, "Configuring an Asynchronous Port."
If you are using a continuous dial-out link, a location entry on the PortMaster must be created for the location identified as isp1. This entry allows the PortMaster to establish a connection with the ISP as soon as it is booted. The new location isp1 should be configured with the values shown in Table 16-5, or as instructed by your ISP.
Note ¯  Configuring the maximum ports setting to a value higher than 0 causes the PortMaster to dial out to a continuous location, or become available for dial-out to an on-demand location. By configuring the maximum ports setting last, you ensure that the PortMaster will not attempt to make a connection with a location until you have configured all the settings for that location.
You can also authenticate using CHAP if it is supported by the ISP.
After configuring the location table settings, save the configuration using the following command:
For more information about configuring locations, see Chapter 8, "Configuring Dial-Out Connections."
The configuration should be tested before the location isp1 is set for continuous dialing. To test the configuration, follow these steps:
-
Enter the following commands to connect from your office to location isp1:
-
Monitor the dial-and-connect sequence between the two locations.
-
If everything connects as expected, reset the port, turn off debugging, and change the location type to continuous:
-
If you notice a problem, do the following:
a. Reset the port.
b. Check your configuration.
c. Dial the ISP again.
d. Repeat this procedure until the connection is made correctly.
-
Contact your ISP if you are unable to connect as expected. The ISP might be able to
provide additional information.
-
When you have configured the PortMaster correctly, reset the port and save the configuration:
To test a network hardwired connection, follow these steps:
-
Reset the newly configured serial port:
-
The network hardwired connection should be established within a few seconds.
-
Verify that the port status is ESTABLISHED by using the following command:
-
If there is a problem, check your configuration.
Contact your ISP if you are unable to connect as expected.
-
When you have configured the PortMaster correctly, reset the port and save the configuration:
Your connection to the Internet can be vulnerable to attack from other Internet users. Therefore, Lucent Remote Access recommends that you add an input filter to the location isp1 for the continuous dial-out connection. For a hardwired connection, you should attach an input filter to the hardwired port.
Note ¯  This section describes an example filter that might not protect your network from all forms of attack. For more information about filters, refer to "Additional References" in the preface and Chapter 9, "Configuring Filters." Refer to the ChoiceNet Administrator's Guide and the RADIUS Administrator's Guide for more information on network security.
The filter named internet.in contains the following rules:
If you have not configured a name server for the PortMaster, use IP addresses instead of hostnames when creating filters. Table 16-6 describes the filter.
If your domain name server is outside your local network, refer to "Input and Output Filters for FTP Packets" on page 9-11.
Using the ISDN port on a PortMaster is very similar to using the serial port, except that you must do the following:
[Top] [Prev] [Next] [Bottom]
spider@livingston.com
Copyright © 1998, Livingston Enterprises, Inc. All rights
reserved.